Welcome to the Ultimate Guide on Creating a Stunning Wooden Arch for Your Summer Camp!
Imagine the excitement in the eyes of campers as they walk through a beautifully crafted arch, signaling the start of their adventure. This article will take you through every step, from designing and building to decorating and maintaining your camp arch. We’ll also cover how to incorporate it into camp activities and ensure it’s safe for everyone. Get ready to transform your camp entrance into a gateway of unforgettable experiences!
What You’ll Learn
In this comprehensive guide, you’ll learn about the essential materials needed for building a wooden arch, followed by a detailed, step-by-step construction process. We’ll share creative decoration ideas to make your arch stand out and discuss important safety considerations to keep your campers secure. Finally, we’ll explore ways to integrate the arch into various camp activities and provide maintenance tips to ensure its longevity.
Who This Guide is For
Whether you’re a camp leader or a DIY enthusiast, this guide will equip you with everything you need to create a memorable summer camp wooden arch.
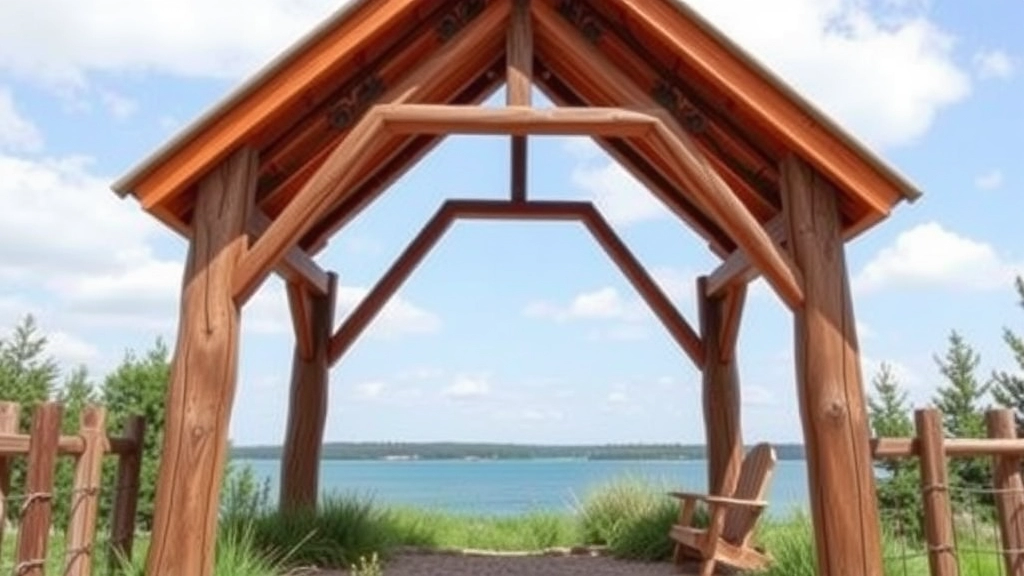
Designing a Wooden Arch for Summer Camps
Ever thought about how a wooden arch could transform your summer camp experience? Picture this: kids arriving at camp, eyes wide with excitement as they walk through a beautifully crafted wooden arch. It’s not just an entrance; it’s a gateway to adventure. But how do you design one that’s both stunning and functional?
Why a Wooden Arch?
First off, why even bother with a wooden arch? Simple. It adds a touch of rustic charm and sets the tone for the entire camp. Plus, it’s a fantastic DIY project that can involve everyone, from camp leaders to the kids themselves.
Key Design Elements
When it comes to designing your wooden arch, there are a few things you need to keep in mind:
- Dimensions: How tall and wide should it be? Think about the number of people passing through and any equipment that needs to fit.
- Materials: What type of wood will you use? Cedar and redwood are popular choices because they’re durable and weather-resistant.
- Style: Do you want something simple and functional, or are you going for a more elaborate design with intricate carvings and decorations?
Getting Started
Before you even pick up a hammer, you need a solid plan. Here’s how to get started:
- Sketch Your Design: Grab a piece of paper and sketch out your arch. Include measurements and any special features you want.
- Gather Inspiration: Look online for ideas. Pinterest and DIY blogs are gold mines for creative designs.
- Consult the Team: Get input from other camp staff or even the kids. They might have some awesome ideas you haven’t thought of.
Practical Considerations
Let’s get real for a second. Designing a wooden arch isn’t just about how it looks. You’ve got to think about:
- Stability: This thing needs to stand up to wind, rain, and a bunch of kids running through it. Make sure your design includes a sturdy base.
- Safety: Sharp edges and splinters are a no-go. Sand down any rough spots and make sure everything is securely fastened.
- Permits: Depending on where your camp is located, you might need a permit to build your arch. Check local regulations to avoid any headaches down the line.
Real-Life Example
Last summer, we decided to build a wooden arch for our camp. We went with a simple A-frame design, using cedar for its durability. The kids got involved by painting their own designs on the wood, making it a collaborative project. The end result? A stunning arch that’s become the iconic entrance to our camp.
So, if you’re thinking about designing a wooden arch for your summer camp, remember: it’s all about combining creativity with practicality. Get your team involved, plan meticulously, and you’ll have a beautiful, functional arch that everyone will love.
For more inspiration on creating engaging camp environments, check out our summer camp activities guide and learn how to set up the perfect summer camp canteen.
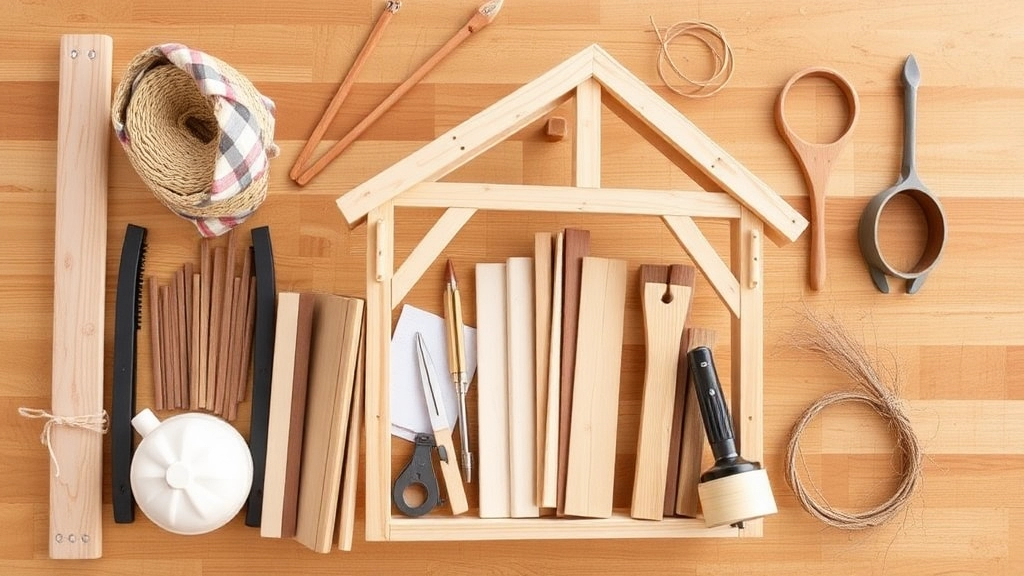
Materials Needed for Building a Wooden Arch
Alright, let’s get straight to it.
You’re thinking about building a wooden arch for your summer camp. Sounds fun, right? But, what do you actually need to get started? Let’s break it down.
Essential Materials
First up, wood. You’ll need sturdy timber. Think oak, cedar, or treated pine. Why? Because you want this arch to last through all the summer fun and weather.
Tools You Can’t Skip
You can’t build an arch with just your hands. So, here’s what you need:
- Saw: To cut the wood to the right size.
- Drill: For making precise holes.
- Screws and Nails: To hold everything together.
- Hammer: Obvious, right?
Safety Gear
Don’t forget safety. Here’s what you should have:
- Safety Goggles: Protect those eyes.
- Gloves: Avoid splinters and blisters.
- Ear Protection: If you’re using loud tools.
Measuring and Levelling Tools
Accuracy is key. So, grab these:
- Tape Measure: Measure twice, cut once.
- Spirit Level: Keep things straight and balanced.
Finishing Touches
Want your arch to look top-notch? Consider these:
- Sandpaper: Smooth out rough edges.
- Wood Stain or Paint: For that polished look.
- Decorative Elements: Lights, banners, or even some climbing plants.
Quick Recap
To sum it up, you need:
- Quality wood
- Essential tools (saw, drill, screws, nails, hammer)
- Safety gear (goggles, gloves, ear protection)
- Measuring tools (tape measure, spirit level)
- Finishing touches (sandpaper, wood stain, decorations)
Got it? Perfect. You’re all set to build a wooden arch that’s both functional and fabulous.
Step-by-Step Guide to Constructing a Wooden Arch
Wondering how to build a wooden arch for your summer camp? You’re not alone. Many camp organisers want to create a welcoming entrance but worry about the complexity. Fear notâlet’s break it down into simple steps. Building a wooden arch can be straightforward and fun, like a DIY project with your mates.
1. Planning Your Wooden Arch
Before you dive in, let’s get clear on the basics.
- Location: Choose a spot that’s both visible and stable.
- Size: Consider how tall and wide you want the arch. Think about who or what will pass under it.
- Design: Sketch it out. A simple curved arch or something more intricate?
2. Gathering Materials
You’ll need:
- Wood: Sturdy timber like cedar or pine.
- Tools: Saw, drill, screws, measuring tape.
- Extras: Sandpaper, wood stain or paint for finishing.
3. Building the Base
The base is your foundation. Get this right, and you’re halfway there.
- Measure and Cut: Cut your wood to the desired length.
- Assemble: Use screws to join the pieces into a stable base.
- Secure: Make sure it’s firmly in place where you want your arch.
4. Constructing the Arch
Now for the fun partâcreating the arch itself.
- Cut the Arch Shape: Use a template or freehand it, depending on your design.
- Connect the Pieces: Attach the arch to the base securely.
- Reinforce: Add extra support if needed to keep it sturdy.
5. Finishing Touches
You want it to look good, right?
- Sand It Down: Smooth any rough edges.
- Stain or Paint: Protect the wood and add visual appeal.
- Decorate: You can get creative hereâthink banners, lights, or camp symbols.
6. Stories from the Field
I remember the first time we built an arch at our camp. It was a bit wobbly at first, but with some teamwork and a few extra screws, it became the perfect entrance. Kids loved decorating it with their artwork, making it truly unique.
7. Final Checks
Before you call it a day:
- Stability Test: Give it a good shake to ensure it’s solid.
- Safety Check: No sharp edges or protruding nails.
Constructing a wooden arch is a rewarding project that adds charm to your camp. With these steps, you’ll have a beautiful, sturdy arch in no time. For more ideas on creating a memorable camp experience, check out our guide on summer camp culture and activities. And if you’re looking for more hands-on projects, don’t miss our art summer camps section for creative inspiration.
Creative Decoration Ideas for Your Camp Arch

Ever wondered how to make your camp arch stand out?
Let’s dive into some creative decoration ideas that’ll make your arch pop.
Why Decorate?
A plain wooden arch is functional, but why not add a bit of flair?
Decorations can set the mood and theme for your camp.
Nature-Inspired Touches
Think about using what’s around you.
- Leaves and Vines: Wrap them around the arch for a natural look.
- Flowers: Fresh or artificial, they add a splash of colour.
Camp-Themed Elements
Make it personal.
- Banners and Flags: Display your camp name or motto.
- Lanterns and Lights: Perfect for evening events.
DIY Craft Ideas
Get the kids involved.
- Paint and Stencils: Let them unleash their creativity.
- Handprints: A fun way to leave a mark.
Stories from the Campfire
I remember one camp where we used old T-shirts to create a patchwork banner.
It told the story of our camp’s history.
The kids loved it!
Seasonal Decorations
Keep it fresh.
- Autumn Leaves: Perfect for a fall camp.
- Snowflakes: If your camp runs in winter.
Safety Considerations for Camp Arches
Alright, let’s get real. When it comes to building a wooden arch for summer camps, safety is non-negotiable. You don’t want kids running around and getting hurt. So, how do we ensure that our camp arch is not just a piece of art but also a fortress of safety? Let’s break it down.
What Are Your Concerns?
I get it. You’re worried about stability, weather resistance, and making sure the arch doesn’t become a hazard. You might be asking:
- Is the arch sturdy enough to withstand a bunch of kids pulling on it?
- Will it hold up against wind and rain?
- What materials are safest for this kind of project?
These are legit questions, and we’re going to tackle each one head-on.
Stability: The Foundation of Safety
First things first, your wooden arch needs a solid foundation. Without it, you’re setting yourself up for failure. Here’s how to ensure stability:
- Deep Anchoring: Make sure the posts are buried at least 2 feet into the ground. Use concrete if you can. This isn’t the time to cut corners.
- Cross-Bracing: Add diagonal supports to prevent wobbling. Think of it as giving your arch a backbone.
- Quality Fasteners: Use heavy-duty screws and bolts instead of nails. They’re less likely to come loose over time.
Weather Resistance: Battle the Elements
Your arch is going to face sun, rain, and maybe even snow. So, what do you do?
- Treated Wood: Opt for pressure-treated wood that resists rot and insects. Cedar and redwood are also great choices.
- Sealant: Apply a weather-resistant sealant. This will protect the wood from moisture and UV damage.
- Regular Checks: Make it a habit to inspect the arch for any signs of wear and tear. Replace any damaged parts immediately.
Material Safety: Choosing the Right Stuff
Not all wood is created equal, and the same goes for the other materials you’ll use.
- Smooth Edges: Sand down any rough edges to prevent splinters. Trust me, you don’t want kids getting hurt on your watch.
- Non-Toxic Paints: If you’re painting the arch, go for non-toxic, eco-friendly paints. Safety first, folks.
- Strong Fasteners: Again, heavy-duty screws and bolts are your best friends here.
Real Stories, Real Solutions
I remember this one time at a summer camp, the arch collapsed because it wasn’t anchored properly. Luckily, no one was hurt, but it was a wake-up call. We went back to the drawing board, dug deeper holes, added cross-bracing, and used concrete. The new arch? Rock solid.
Regular Maintenance: The Unsung Hero
Don’t just build it and forget it. Regular maintenance is key to longevity and safety.
- Monthly Inspections: Check for loose screws, cracks, or any signs of instability.
- Seasonal Upkeep: Reapply sealant annually. Replace any worn-out parts before they become a problem.
- Immediate Repairs: Don’t procrastinate. If something’s off, fix it immediately.
Safety First, Fun Always
At the end of the day, your wooden arch is there to enhance the camp experience, not hinder it. By focusing on stability, weather resistance, and material safety, you’re not just building an arch; you’re building a safe and fun environment for everyone. For more tips on creating a safe and enjoyable camp environment, check out our guide on summer camp activities and our summer camp starter pack.
Incorporating the Arch into Camp Activities
Ever wondered how to make your camp experience unforgettable?
A wooden arch can be your secret weapon.
It’s not just a structure; it’s a game-changer.
Let’s dive into how you can weave this arch into your camp activities.
Welcoming Ceremonies
Kick off your camp with a bang.
Imagine this:
Campers walking through the arch as they arrive.
It sets the tone.
It’s like a gateway to adventure.
Photo Ops
Everyone loves a good photo spot.
Your arch can be that Instagrammable moment.
Pro Tip:
Decorate it with seasonal themes or camp colours.
It makes every photo pop.
Games and Challenges
Turn the arch into a part of your games.
Think about this:
- Relay races where teams run through the arch.
- Scavenger hunts with clues hidden around it.
- Obstacle courses incorporating the arch as a checkpoint.
It adds an extra layer of fun.
Storytelling Sessions
Gather the kids around the arch for storytelling.
The arch creates a focal point.
It’s like a stage in the wild.
Bonus:
Hang fairy lights for night-time stories.
Awards and Celebrations
Use the arch as a backdrop for award ceremonies.
It frames the moment perfectly.
Imagine:
Handing out medals and certificates under the arch.
It makes every achievement feel grand.
Campfire Evenings
Position your arch near the campfire.
It adds a magical touch.
Pro Tip:
Drape some banners or flags.
It enhances the campfire vibe.
Daily Rituals
Make the arch part of your daily routine.
For example:
- Morning assemblies under the arch.
- Evening reflections before heading to bed.
It becomes a symbol of unity.
Interactive Workshops
Host workshops around the arch.
Whether it’s arts and crafts or nature talks, the arch can be a central point.
Think about this:
Kids decorating the arch as part of an art project.
It’s hands-on and engaging.
Maintenance Tips for Long-Lasting Arches
Ever wondered why some wooden arches stand tall for years while others crumble in no time?
I get it. You’ve put in the sweat to build that arch, and now you want it to last.
Let’s dive into some no-nonsense, tried-and-true maintenance tips to keep your camp arch looking stellar year after year.
Regular Inspections
First off, make inspections a habit.
Why?
Because catching small issues early can save you a ton of headaches later.
- Monthly Checks: Look for signs of wear and tear. Cracks, splits, or any loose joints.
- Seasonal Inspections: Before and after the summer camp season, give your arch a thorough once-over.
Cleaning the Arch
Dirt and grime can speed up the deterioration process. Keep it clean, folks.
- Mild Soap and Water: A simple mix to scrub off dirt.
- Avoid Harsh Chemicals: They can damage the wood and any protective coatings.
Protective Coatings
Think of it like sunscreen for your arch.
- Sealants and Stains: Apply a good quality wood sealant or stain every couple of years. It protects against moisture and UV rays.
- Waterproofing: Especially crucial if your arch is exposed to the elements regularly.
Pest Control
Wood and pests don’t mix.
- Regular Treatments: Use wood preservatives that deter insects.
- Check for Infestations: Look for small holes or sawdust. These are signs of wood-boring insects.
Structural Integrity
This is the backbone of your arch.
- Tighten Screws and Bolts: Loose fasteners can weaken the structure.
- Replace Damaged Parts: Don’t ignore any broken or rotting pieces. Replace them ASAP.
Weather Protection
Mother Nature can be a bit harsh sometimes.
- Cover During Off-Season: If possible, cover the arch or move it to a sheltered location during winter or heavy rains.
- Elevate the Base: Ensure the base of the arch isn’t in direct contact with the ground. Use stones or treated lumber to elevate it.
Real Talk: My Experience
I remember the first arch I built. Looked great for a year, then started sagging.
Why?
I ignored these basic maintenance steps.
Learn from my mistakes.
Incorporate into Camp Activities
While you’re at it, why not make maintenance a part of camp activities?
Kids love hands-on projects.
- Teach Them: Show campers how to inspect and maintain the arch.
- DIY Workshops: Organise sessions where they help with cleaning and minor repairs.
For more ideas on engaging kids in camp activities, check out our Summer Camp Activities: Fun and Learning Combined guide. If you’re looking for a deeper dive into camp traditions, our article on Summer Camp Culture: Traditions, Activities, and Growth is a must-read.
FAQs on Building and Using a Wooden Arch for Summer Camp
What materials do I need to build a wooden arch for my summer camp?
To build a wooden arch, you’ll need quality wood such as oak, cedar, or treated pine. Additionally, essential tools like a saw, drill, screws, nails, and a hammer are necessary. Don’t forget safety gear like goggles, gloves, and ear protection. Measuring tools such as a tape measure and spirit level are also important. Finally, for finishing touches, consider sandpaper, wood stain or paint, and decorative elements.
Why should I consider decorating my camp arch?
Decorating your camp arch can add flair and set the mood and theme for your camp. It transforms a functional structure into a visually appealing and thematic element that enhances the overall camp experience.
What are some creative decoration ideas for my camp arch?
Consider nature-inspired touches like leaves, vines, and flowers. Camp-themed elements such as banners, flags, lanterns, and lights can also add a personal touch. DIY crafts like painting, stencils, and handprints can involve campers in the decoration process. Seasonal decorations like autumn leaves or snowflakes can keep the arch looking fresh and relevant.
How can I incorporate the wooden arch into camp activities?
The wooden arch can be used in various camp activities to enhance the experience. It can serve as a gateway for welcoming ceremonies, a backdrop for photo ops, a checkpoint in games and challenges, a focal point for storytelling sessions, and a stage for awards and celebrations. Additionally, it can be part of daily rituals and interactive workshops.
What are some safety tips when building a wooden arch?
Always wear safety gear such as goggles, gloves, and ear protection. Ensure you measure accurately using a tape measure and spirit level to maintain balance and stability. Use quality wood and secure all parts firmly with screws and nails to ensure the arch is sturdy and safe.
Can I involve campers in the decoration process?
Absolutely! Involving campers in decorating the arch can be a fun and engaging activity. They can participate in DIY crafts like painting, using stencils, and adding handprints. This not only makes the arch unique but also creates a sense of ownership and pride among the campers.
What are some seasonal decoration ideas for the arch?
For autumn, you can use autumn leaves and warm-toned decorations. If your camp runs in winter, consider using snowflakes and winter-themed elements. Adjusting the decorations according to the season keeps the arch looking fresh and relevant.
How can the arch be used during campfire evenings?
Position the arch near the campfire to add a magical touch. Drape banners or flags over it to enhance the campfire vibe. It creates a cozy and inviting atmosphere for evening gatherings.
What tools are essential for building a wooden arch?
Essential tools include a saw for cutting wood, a drill for making precise holes, screws and nails for assembly, and a hammer. Measuring tools like a tape measure and spirit level are also crucial for accuracy.
How can the arch enhance daily camp rituals?
Incorporate the arch into daily routines such as morning assemblies and evening reflections. It can serve as a symbol of unity and create a consistent focal point for campers to gather around.
References
-
How to Build a Garden Arch
-
How to Build a Garden Arch – This Old House
-
How to Build a Garden Arch – DIY Network