Summer Camp Lunch Ideas
Ever found yourself stumped on summer camp lunch ideas that require no refrigeration? You’re not alone. In this article, we explore a range of delicious, nutritious, and easy-to-pack meals that stay fresh without a fridge. From creative wraps and protein-packed snacks to DIY trail mix and hydration tips, we’ve got you covered.
Discover how to pack lunches that are both safe and enjoyable with our guide on non-perishable options. We’ll delve into shelf-stable dairy, fresh fruits, and veggies, and even share some pro tips for keeping your meals intact. Say goodbye to soggy sandwiches and hello to a hassle-free lunch experience!
Nutritious Non-Perishable Lunch Options
Ever wondered how to pack a nutritious lunch that doesn’t need refrigeration? You’re not alone. Whether you’re on the go, at work, or just want to avoid the hassle of a cooler, finding non-perishable options can be a game-changer. Let’s dive into some practical, tasty, and healthy choices that stay fresh without a fridge.
Why Non-Perishable?
First off, why even bother with non-perishable lunch options? Here are some real-life scenarios where they come in handy:
- Long workdays where access to a fridge is limited.
- Outdoor adventures like hiking or picnics.
- Busy parents needing quick and easy lunch solutions for kids.
Top Nutritious Non-Perishable Lunch Options
When it comes to packing a lunch that doesn’t require refrigeration, it’s all about smart choices. Here’s a list of some go-to items:
- Canned Tuna or Salmon: Packed with protein and omega-3s. Just make sure to choose varieties with a pull-tab for easy opening.
- Nut Butters: Almond, peanut, or cashew butter are great on whole grain bread or with apple slices. Look for single-serve packets for convenience.
- Whole Grain Crackers: Pair these with your favourite spreads or cheeses that don’t require refrigeration.
- Dried Fruits and Nuts: A fantastic mix of vitamins, minerals, and healthy fats. Think raisins, apricots, almonds, and walnuts.
- Energy Bars: Opt for those with natural ingredients and minimal added sugars. They’re perfect for a quick, nutritious boost.
Pro Tips for Packing Non-Perishable Lunches
Let’s break it down into bite-sized tips:
- Use Insulated Bags: While the food itself doesn’t need a fridge, an insulated bag can help maintain a stable temperature.
- Portion Control: Pre-portion snacks and meals to avoid overeating and ensure balanced nutrition.
- Stay Hydrated: Always pack a bottle of water. Dehydration can sneak up on you, especially on hot days.
Real-Life Example
Imagine you’re heading out for a full day of meetings. You pack a can of tuna, whole grain crackers, a handful of dried apricots, and an energy bar. Toss it all into an insulated bag with a bottle of water, and you’re set. No fridge, no problem.
Quick Recap
Packing a nutritious, non-perishable lunch doesn’t have to be complicated. With a bit of planning, you can enjoy delicious, healthy meals wherever you are. Remember:
- Canned proteins like tuna or salmon.
- Nut butters and whole grain options.
- Dried fruits and nuts for a balanced snack.
- Energy bars for quick nutrition.
For more ideas on how to prepare for outdoor adventures, check out our top tips for summer tent camping. And if you’re planning a summer party, don’t miss our guide on how to host the ultimate summer camp party bash.
Easy-to-Pack Sandwich Ideas
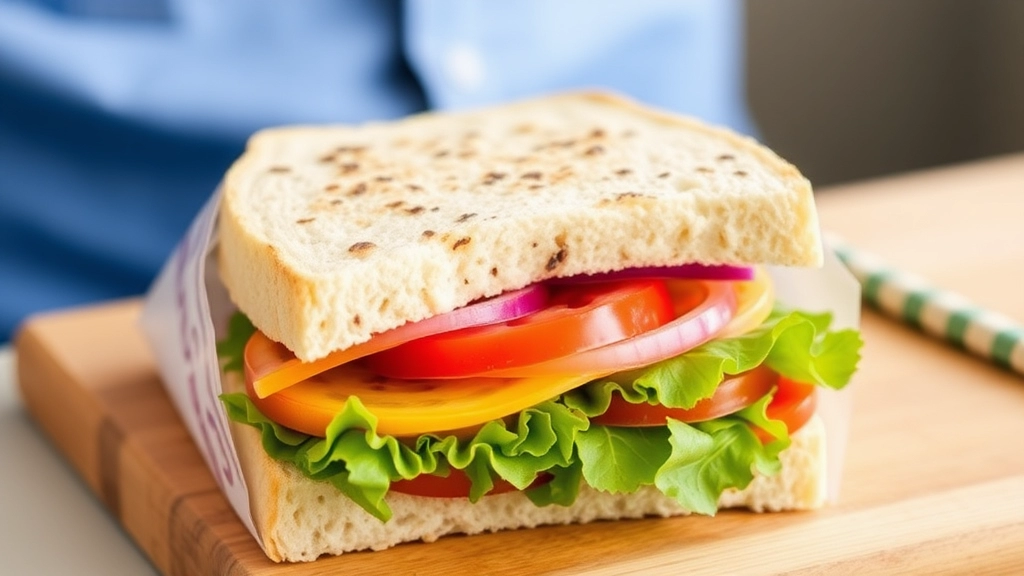
Ever wondered how to pack a sandwich that doesn’t turn into a soggy mess by lunchtime?
You’re not alone.
Let’s dive into some easy-to-pack sandwich ideas that stay fresh and delicious without refrigeration.
Classic PB&J
You can’t go wrong with a classic peanut butter and jelly sandwich. It’s simple, tasty, and doesn’t need to be kept cold. Just make sure to spread the peanut butter on both slices of bread to keep the jelly from soaking through.
Hummus and Veggie Delight
Want something a bit more gourmet? Try a hummus and veggie sandwich. Spread a generous layer of hummus on whole grain bread, then add sliced cucumbers, bell peppers, and spinach. The hummus acts as a barrier to keep the bread from getting soggy.
Tuna Salad with a Twist
Okay, tuna might sound tricky, but here’s a tip: use tuna packets instead of canned tuna. Mix with some olive oil, lemon juice, and spices. Pack the tuna mix separately and assemble your sandwich at lunchtime. Easy-peasy and no refrigeration needed.
Turkey and Cheese Roll-Ups
For a low-carb option, go for turkey and cheese roll-ups. Lay out slices of turkey, place a slice of cheese on top, and roll them up. Wrap in foil and you’re good to go. These are perfect for a quick bite.
Nut Butter and Banana
Another classic is the nut butter and banana sandwich. Whether it’s almond butter or peanut butter, pair it with banana slices for a sweet and filling meal. This one holds up well without refrigeration.
Veggie and Bean Spread
For a vegan option, consider a veggie and bean spread sandwich. Mash up some black beans, add a bit of olive oil, lime juice, and spices. Spread it on your bread and top with your favourite veggies. This one is hearty and nutritious.
Chicken Salad Wrap
If you’re into wraps, a chicken salad wrap can be a great option. Use canned chicken, mix with some mayo or Greek yoghurt, and add some diced celery and grapes. Wrap it up in a tortilla and you’re set.
Quick Tips for Sandwich Success
- Use hearty bread: Whole grain or sourdough are less likely to get soggy.
- Layer smartly: Put moisture-heavy ingredients in the middle.
- Wrap tightly: Use foil or beeswax wraps to keep everything together.
There you have it.
Some easy-to-pack sandwich ideas that won’t let you down.
Give them a try and see how they fit into your lunch routine.
Protein-Packed Snacks Without Refrigeration
Ever found yourself wondering, “How can I keep my protein intake up without lugging around a cooler?” Trust me, I’ve been there. You want snacks that are not just convenient but also packed with protein to keep you going through the day. No one wants to deal with food spoilage or the hassle of a bulky ice pack. So, let’s dive into some protein-packed snacks without refrigeration that are easy to carry and delicious to eat.
Why Protein Matters
First off, why do we even care about protein? It’s simple. Protein is the building block of muscles, and it keeps you full longer. Whether you’re hitting the gym, stuck in meetings, or just need a midday pick-me-up, protein is your best friend.
Top Protein-Packed Snacks
Here’s a list of go-to snacks that are high in protein and don’t need refrigeration:
- Jerky: Beef, turkey, or even vegan options like mushroom jerky. These are portable, tasty, and packed with protein.
- Nuts and Seeds: Almonds, cashews, and sunflower seeds. They’re not just protein-rich but also loaded with healthy fats.
- Protein Bars: Choose ones with natural ingredients. Look for bars with at least 10 grams of protein and low sugar.
- Canned Tuna or Salmon: Opt for single-serve pouches. They’re easy to open and can be eaten straight from the pack.
- Nut Butter Packs: Almond butter, peanut butter, or mixed nut butter. Pair them with whole grain crackers for a balanced snack.
- Roasted Chickpeas: Crunchy, delicious, and full of protein. Plus, they come in various flavours.
- Boiled Eggs: Okay, this one needs a bit of prep, but if you boil them the night before, they can last a day without refrigeration.
Quick Story: My Jerky Revelation
I used to think jerky was just for road trips until I started packing it for my daily routine. One day, I was rushing between meetings and realised I hadn’t eaten. I pulled out a pack of beef jerky, and it was a game-changer. It kept me full and focused without the need for a fridge. Now, I keep a stash in my bag at all times.
Tips for Choosing the Best Snacks
When picking out your protein-packed snacks, keep these tips in mind:
- Check the Ingredients: Avoid snacks with too many preservatives or artificial ingredients.
- Mind the Sodium: Some protein snacks can be high in sodium. Look for lower-sodium options if that’s a concern.
- Portion Control: It’s easy to overeat snacks like nuts and seeds. Pre-portion them to avoid going overboard.
If you’re planning a camping trip, you might want to check out our guide on summer camping essentials for more tips and tricks. Additionally, for those considering sending their kids to camp, our ultimate checklist for packing for summer camp can be a lifesaver.
Fresh Fruits and Vegetables That Don’t Require Cooling
Ever wondered if there are fresh fruits and veggies that can survive without a fridge?
You’re not alone.
Most of us think we need to refrigerate everything to keep it fresh.
But guess what?
Some fruits and veggies are perfectly fine at room temperature.
Let’s dive into it.
Fruits That Stay Fresh Without Cooling
1. Apples
- They can sit on your counter for a week or more.
- Perfect for a quick snack or to add to a salad.
2. Bananas
- Better off outside the fridge to ripen naturally.
- Great for energy boosts.
3. Oranges
- Lasts a couple of weeks at room temp.
- Easy to peel and eat on the go.
4. Avocados
- Ripen better outside the fridge.
- Just keep an eye on them so they don’t get too soft.
5. Grapes
- Can last a few days outside.
- Just wash and pack them for a juicy treat.
Veggies That Don’t Need Cooling
1. Carrots
- Store them in a cool, dark place.
- Crunchy and perfect for dipping.
2. Bell Peppers
- Lasts a few days without cooling.
- Great for adding some crunch to your lunch.
3. Cucumbers
- Can stay fresh for a couple of days.
- Slices make a refreshing snack.
4. Cherry Tomatoes
- Better flavour at room temperature.
- Toss them in a salad or munch on them as is.
5. Radishes
- Keep them in a cool spot.
- Adds a spicy kick to your meal.
Pro Tips for Packing Fresh Produce
- Wash and Dry: Clean your fruits and veggies before packing.
- Separate Compartments: Use different sections in your lunchbox to avoid squishing.
- Paper Towels: Line your containers with paper towels to absorb excess moisture.
Real Talk
I used to think my packed lunches had to be boring and bland because I didn’t have a fridge at work.
But then I discovered these fresh options.
It was a game-changer.
Now, my lunches are vibrant and full of flavour.
And I don’t have to worry about them going bad.
So, next time you’re packing your lunch, remember these fresh fruits and veggies.
They’ll keep your meals interesting and nutritious, no fridge required.
Creative Wraps and Roll-Ups
Ever wondered how to keep your lunch exciting without needing a fridge? You’re not alone. Many of us struggle to find tasty, nutritious, and easy-to-pack meals that don’t require refrigeration. That’s where creative wraps and roll-ups come in. They’re versatile, portable, and can be packed with all sorts of delicious fillings. Let’s dive into some ideas that will make your lunch the envy of the office or school cafeteria.
Why Wraps and Roll-Ups?
Wraps and roll-ups are a game-changer for non-perishable lunches. Why? Because they:
- Stay fresh longer without refrigeration.
- Are easy to prepare and pack.
- Offer endless variety so you never get bored.
Types of Wraps
First things first, let’s talk about the types of wraps you can use. You don’t have to stick to boring old tortillas. Here are some options to keep things interesting:
- Whole Wheat Tortillas: A healthier alternative to regular tortillas.
- Spinach Wraps: Adds a hint of flavour and extra nutrients.
- Nori Sheets: Perfect for a sushi-inspired roll-up.
- Collard Greens: Great for a low-carb option.
- Pita Bread: Ideal for stuffing with your favourite fillings.
Filling Ideas
Now, onto the fun partâthe fillings. The possibilities are endless, but here are some tried-and-true combinations to get you started:
- Hummus and Veggie Wrap: Spread hummus on your wrap and add sliced cucumbers, bell peppers, and shredded carrots. Roll it up and you’re good to go.
- Chicken Caesar Roll-Up: Use pre-cooked chicken strips, romaine lettuce, and a drizzle of Caesar dressing. Wrap it in a whole wheat tortilla.
- Tuna Salad Wrap: Mix canned tuna with a bit of mayo, chopped celery, and a squeeze of lemon. Spread it on a spinach wrap and add some lettuce.
- Peanut Butter and Banana Roll-Up: For a sweet treat, spread peanut butter on a whole wheat tortilla and add banana slices. Roll it up and enjoy.
- Mediterranean Wrap: Fill a nori sheet with hummus, sliced olives, feta cheese, and cherry tomatoes. Roll it sushi-style for a unique twist.
Tips for Perfect Wraps and Roll-Ups
To make sure your wraps and roll-ups are a hit, keep these tips in mind:
- Don’t Overfill: Less is more when it comes to fillings. Overstuffing can make your wrap difficult to roll and eat.
- Seal the Edges: Use a bit of hummus, cream cheese, or any spread to seal the edges of your wrap. This helps keep everything in place.
- Keep It Dry: Avoid adding too many wet ingredients, as they can make your wrap soggy. If you’re using items like tomatoes or cucumbers, pat them dry with a paper towel first.
- Wrap in Parchment Paper: This helps keep your wrap intact and makes it easier to eat on the go.
Real-Life Example
I remember one time I packed a chicken Caesar roll-up for a long hike. It was a hot day, and I was worried it would spoil. But thanks to the non-perishable ingredients, it stayed fresh and delicious. It was the perfect energy boost I needed halfway through my trek.
For more nutritious meal ideas that are perfect for summer, check out our Summer Camp Meal Ideas and if you’re looking for tips on keeping your camp menu balanced, don’t miss our guide on Balanced Summer Camp Menu Ideas.
Shelf-Stable Dairy Alternatives
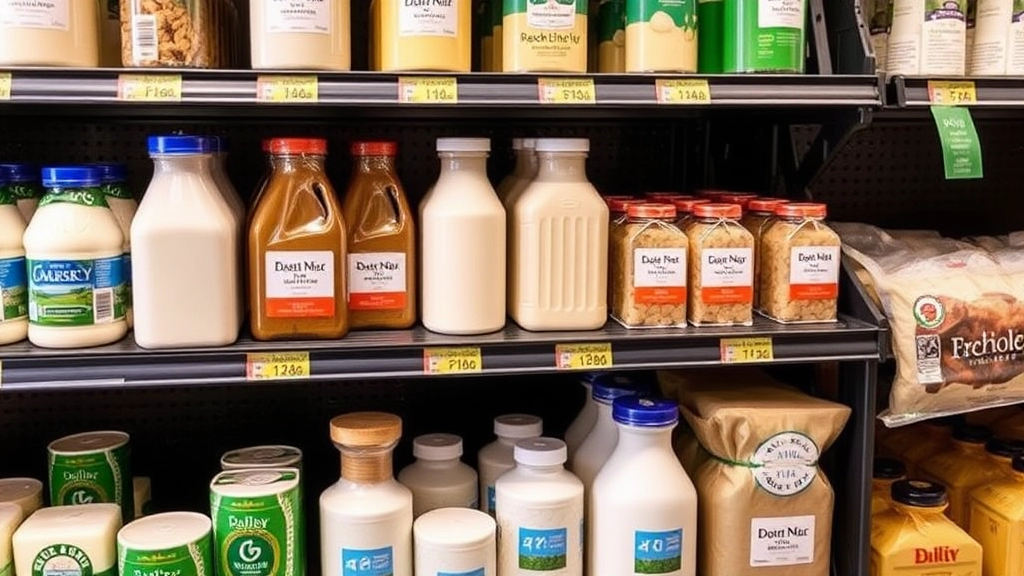
Ever wondered how to keep dairy in your lunch without needing a fridge?
Yeah, me too.
Here’s the thing: shelf-stable dairy alternatives are a game-changer.
Why Go Shelf-Stable?
No one wants to lug around a cooler all day.
And let’s be real, warm milk is gross.
So, what’s the solution?
Shelf-stable options.
The Top Picks
1. Plant-Based Milks
- Almond Milk: Great in coffee or cereal.
- Soy Milk: High in protein.
- Oat Milk: Creamy and delicious.
2. Cheese
- Hard Cheeses: Think Parmesan or Gouda. They can handle a few hours outside the fridge.
- Shelf-Stable Cheese Packs: Individually wrapped and ready to go.
3. Yogurt
- Non-Dairy Yogurt: Made from coconut, almond, or soy. Look for the ones that don’t need refrigeration.
Real Talk
I once packed a lunch with regular cheese on a hot day.
Big mistake.
By noon, it was a sweaty, smelly mess.
Lesson learned.
How to Pack It
Keep it simple.
- Use Insulated Bags: They help, even if you don’t have ice packs.
- Separate Compartments: Keep dairy away from other items to maintain texture and taste.
- Sealed Containers: No leaks, no mess.
Benefits
- Convenience: No need to worry about finding a fridge.
- Variety: So many options to keep your lunch exciting.
- Nutrition: Packed with protein, calcium, and other essentials.
Quick Tips
- Read Labels: Make sure it’s really shelf-stable.
- Portion Control: Don’t overpack. Stick to what you’ll actually eat.
- Stay Hydrated: Dairy can make you thirsty. Keep water handy.
Hydration Solutions for Hot Days
Ever found yourself parched and desperate for a drink on a scorching day? We’ve all been there. Staying hydrated isn’t just about quenching your thirst; it’s about keeping your energy levels up and your mind sharp. So, let’s dive into some hydration solutions for hot days that will keep you cool and refreshed.
Why Hydration Matters
First off, let’s tackle the big question: Why is hydration so crucial, especially on hot days? When you’re sweating buckets, you’re losing more than just water; you’re also losing essential electrolytes. This can lead to dehydration, fatigue, and even heatstroke. So, keeping hydrated is non-negotiable.
Water: The Ultimate Hydrator
Water is your best friend when it comes to staying hydrated. But let’s face it, plain water can get boring. Here are some ways to jazz it up:
- Infused Water: Add slices of lemon, cucumber, or berries to your water bottle. It not only makes the water taste better but also adds a touch of vitamins.
- Electrolyte Tablets: These are a lifesaver. Drop one into your water bottle, and boomâinstant electrolyte boost.
Hydration Alternatives
Not a fan of water? No worries. There are plenty of other options to keep you hydrated:
- Coconut Water: Packed with natural electrolytes, it’s nature’s sports drink.
- Herbal Teas: Brew some iced herbal tea. It’s refreshing and comes with various health benefits.
- Sports Drinks: These are great for replenishing lost electrolytes, but watch out for the sugar content.
Portable Hydration Solutions
When you’re on the go, you need something portable. Here are some nifty ideas:
- Reusable Water Bottles: Invest in a good one. Some come with built-in filters, so you can fill up anywhere.
- Hydration Packs: If you’re into hiking or cycling, these are super handy. They fit snugly on your back and come with a straw for easy sipping.
- Collapsible Water Bottles: These are perfect for saving space in your bag when they’re empty.
Hydration Tips for Hot Days
Let’s break down some practical tips to keep you hydrated:
- Start Early: Begin your day with a big glass of water.
- Set Reminders: Use your phone to remind you to drink water every hour.
- Snack Smart: Opt for water-rich snacks like watermelon, cucumber, and oranges.
- Avoid Caffeine and Alcohol: These can dehydrate you, so try to limit them.
Real-Life Example
I remember a summer hike where I underestimated the heat. Halfway through, I was out of water and feeling dizzy. Luckily, a fellow hiker shared some coconut water with me, and it was a game-changer. From that day on, I always pack extra hydration options.
For more tips on staying cool during summer, check out our article on keeping your camper cool in summer. And if you’re planning a summer camp trip, don’t miss our charter bus tips for a perfect summer camp trip.
DIY Trail Mix and Granola Bars
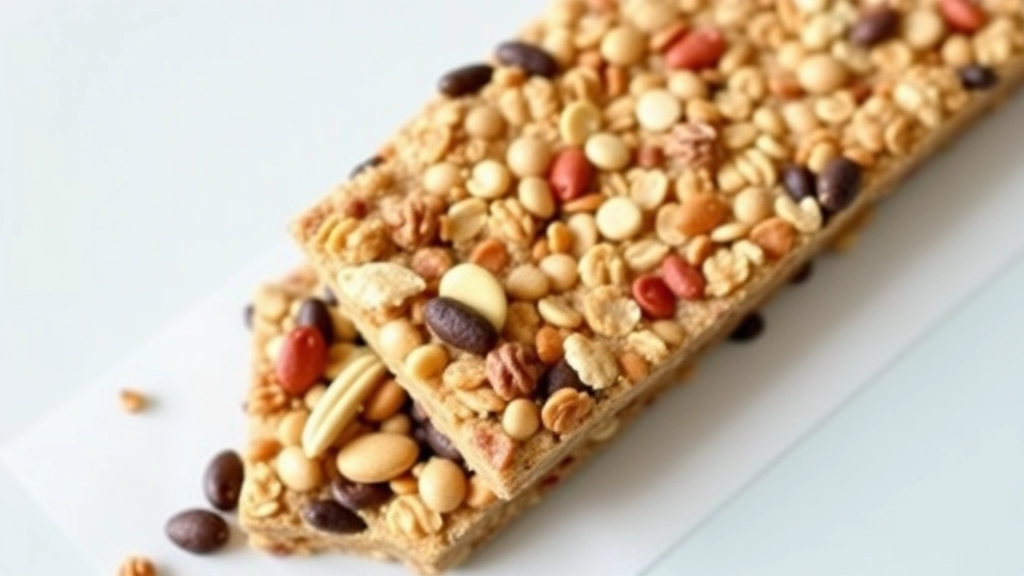
Ever been stuck wondering what snacks to pack that won’t turn into a soggy mess by lunchtime?
Let’s dive into DIY Trail Mix and Granola Bars—your new go-to for portable, non-perishable snacks.
Why DIY Trail Mix?
Trail mix is a lifesaver.
It’s easy to make, doesn’t require refrigeration, and can be tailored to your taste. Plus, it’s packed with nutrients.
Here’s how you can whip up a batch:
- Choose Your Base:
- Nuts (almonds, cashews, walnuts)
- Seeds (pumpkin, sunflower)
- Add Some Sweetness:
- Dried fruits (raisins, cranberries, apricots)
- Dark chocolate chips
- Throw in Some Crunch:
- Pretzels
- Whole grain cereals
- Mix It Up:
- Toss all ingredients in a bowl
- Store in an airtight container
Granola Bars – The Ultimate Grab-and-Go
Granola bars are another fantastic option. They’re easy to make and customisable.
Here’s a simple recipe:
Ingredients:
- 2 cups rolled oats
- 1 cup nuts (chopped)
- 1/2 cup honey or maple syrup
- 1/2 cup dried fruits
- 1/4 cup nut butter
Steps:
- Mix Dry Ingredients:
- Combine oats, nuts, and dried fruits in a bowl.
- Heat Wet Ingredients:
- Warm honey/maple syrup and nut butter in a saucepan until smooth.
- Combine:
- Pour the wet mixture over the dry ingredients and mix well.
- Press and Chill:
- Press the mixture into a lined baking tray.
- Chill for at least 2 hours, then cut into bars.
Why Go DIY?
Store-bought snacks often come with added sugars and preservatives. Making your own means you control the ingredients. Plus, it’s cheaper in the long run.
Pro Tips:
- Storage: Keep your trail mix and granola bars in airtight containers. They’ll stay fresh longer.
- Portion Control: Pre-pack into small bags or containers for easy grab-and-go.
- Mix It Up: Change your ingredients regularly to keep things interesting.
So, next time you’re packing lunch, remember your DIY trail mix and granola bars. They’re nutritious, easy to make, and perfect for on-the-go snacking.
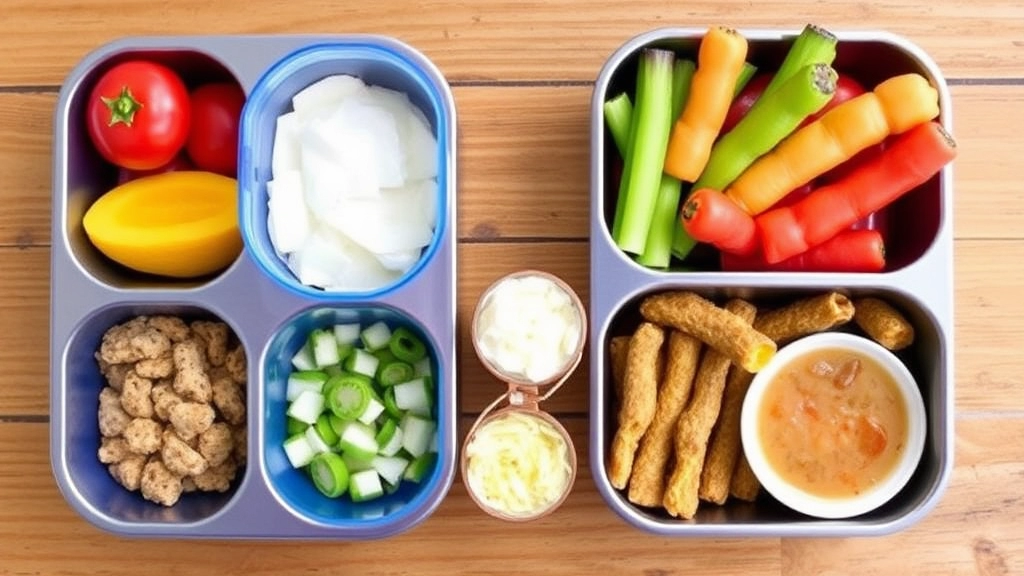
Portable Meal Kits and Bento Boxes
Ever wondered how to keep your lunch fresh and exciting without the hassle of a fridge? Portable meal kits and bento boxes are your best mates here. These little wonders are perfect for those of us always on the move, needing a nutritious and tasty meal that doesn’t spoil by midday. Let’s dive into how you can make the most of these handy containers.
Why Portable Meal Kits and Bento Boxes?
Convenience: No more soggy sandwiches or wilted salads. Everything stays neat, tidy, and ready to eat.
Variety: Mix and match different foods to keep your taste buds entertained.
Portion Control: Helps you stick to your dietary goals without the guesswork.
Building Your Perfect Portable Meal Kit
- Start With the Basics:
- Main Protein: Grilled chicken, tofu, or hard-boiled eggs.
- Carbs: Quinoa, brown rice, or whole-grain pasta.
- Veggies: Cherry tomatoes, carrot sticks, or cucumber slices.
- Add Some Extras:
- Healthy Fats: Avocado slices, nuts, or seeds.
- Dips and Sauces: Hummus, guacamole, or a small container of your favourite dressing.
- Keep It Fresh:
- Fruit: Apple slices, grapes, or berries.
- Snack: A small piece of dark chocolate or a handful of trail mix.
Real Talk: What Works and What Doesn’t
You know those days when you’re rushing out the door, and you just grab whatever’s in the fridge? Yeah, we’ve all been there. But with a bit of planning, your portable meal kit can be a game-changer. Here’s what I’ve learned:
- Avoid Soggy Foods: No one likes a mushy meal. Stick to items that hold up well without refrigeration.
- Prep Ahead: Spend a bit of time on Sunday night prepping your ingredients. Trust me, your future self will thank you.
- Use Dividers: Bento boxes with compartments keep everything separate and fresh. No one wants their fruit tasting like chicken!
Quick Tips for a Winning Bento Box
- Layering: Place heavier items on the bottom and lighter ones on top to keep things from getting squished.
- Colour Coding: Use a variety of colourful foods to make your meal visually appealing and nutritionally balanced.
- Spices and Herbs: A sprinkle of herbs or spices can elevate your meal from bland to grand.
Personal Favourites
One of my go-to combos is grilled chicken with quinoa, a side of cherry tomatoes and cucumber slices, a small tub of hummus, and some apple slices. It’s quick, easy, and keeps me full until dinner.
Safety Tips
- Keep It Cool: Use an insulated lunch bag with an ice pack if you’re worried about certain items spoiling.
- Check Expiry Dates: Always make sure your ingredients are fresh and within their use-by dates.
For more nutritious and fun meal ideas, check out our Summer Camp Meal Ideas. And if you need some tips on keeping your snacks healthy and exciting, don’t miss our guide on Healthy Summer Camp Snacks.
Safety Tips for Packing Non-Refrigerated Lunches
Ever worried about packing lunches that don’t need refrigeration?
Let’s face it, no one wants to risk food poisoning.
And, keeping your food safe is easier than you think.
Here’s how you can do it.
Why Worry About Non-Refrigerated Lunches?
First off, let’s talk about why this even matters.
When you pack a lunch that doesn’t need a fridge, you’re often concerned about:
- Spoilage
- Bacteria growth
- Taste and texture
So, how do you keep your lunch safe and tasty?
Choose the Right Foods
Start with foods that are naturally safe without refrigeration:
- Canned goods
- Dried fruits
- Nuts and seeds
- Hard cheeses
These options don’t spoil quickly.
Keep It Clean
Cleanliness is crucial.
Always:
- Wash your hands before preparing food.
- Use clean utensils and containers.
- Sanitise surfaces where you prep your lunch.
Use Insulated Bags and Ice Packs
Even if your food doesn’t need a fridge, an insulated bag or ice pack can help.
- Keeps food at a safer temperature
- Reduces the risk of bacteria growth
Pack Smart
Layering can make a difference:
- Put cold items at the bottom.
- Place less perishable items on top.
- Use separate containers for different foods.
Mind the Clock
Time is a factor too.
- Don’t leave food out for more than 2 hours.
- If it’s a hot day, reduce that time to 1 hour.
Watch Out for Cross-Contamination
Cross-contamination is a big no-no.
- Keep raw and cooked foods separate.
- Use different cutting boards for meats and vegetables.
Trust Your Senses
If it looks off, smells weird, or tastes funny, toss it.
Better safe than sorry.
Quick Recap
- Choose non-perishable foods.
- Keep everything clean.
- Use insulated bags and ice packs.
- Pack smart.
- Mind the clock.
- Avoid cross-contamination.
- Trust your senses.
Got any other worries about packing lunches? Check out our summer camp lunch ideas for more tips.
Let’s chat about it.
Remember, the key is to keep it simple and safe. For more on keeping your camp experience enjoyable, visit our summer camp activity ideas page.
FAQs about Summer Camp Lunch Ideas No Refrigeration
What are some easy-to-pack sandwich ideas that don’t require refrigeration?
Here are a few ideas:
- Classic PB&J: Spread peanut butter on both slices of bread to keep the jelly from soaking through.
- Hummus and Veggie Delight: Use hummus as a barrier to keep the bread from getting soggy.
- Tuna Salad with a Twist: Use tuna packets and mix with olive oil and lemon juice.
- Turkey and Cheese Roll-Ups: Roll turkey and cheese slices for a low-carb option.
- Nut Butter and Banana: Pair nut butter with banana slices for a sweet and filling meal.
- Veggie and Bean Spread: Mash black beans with olive oil and lime juice, then add veggies.
- Chicken Salad Wrap: Use canned chicken mixed with mayo or Greek yoghurt, celery, and grapes.
Which fruits and vegetables don’t need refrigeration?
Several fruits and vegetables can stay fresh without cooling:
- Fruits: Apples, bananas, oranges, avocados, and grapes.
- Vegetables: Carrots, bell peppers, cucumbers, cherry tomatoes, and radishes.
Are there any dairy alternatives that don’t require refrigeration?
Yes, there are several shelf-stable dairy alternatives:
- Plant-Based Milks: Almond milk, soy milk, and oat milk.
- Cheese: Hard cheeses like Parmesan or Gouda and shelf-stable cheese packs.
- Yogurt: Non-dairy yogurt made from coconut, almond, or soy.
How can I make DIY trail mix and granola bars for summer camp lunches?
Here are some simple steps:
- DIY Trail Mix:
- Choose a base of nuts and seeds.
- Add dried fruits and dark chocolate chips for sweetness.
- Include pretzels or whole grain cereals for crunch.
- Mix and store in an airtight container.
- Granola Bars:
- Mix rolled oats, chopped nuts, and dried fruits.
- Heat honey or maple syrup with nut butter until smooth.
- Combine the wet and dry ingredients.
- Press into a baking tray and chill before cutting into bars.
What are some quick tips for packing non-refrigerated lunches?
Here are a few tips to keep your lunch fresh and delicious:
- Use hearty bread: Whole grain or sourdough are less likely to get soggy.
- Layer smartly: Put moisture-heavy ingredients in the middle.
- Wrap tightly: Use foil or beeswax wraps to keep everything together.
- Wash and dry produce: Clean your fruits and veggies before packing.
- Separate compartments: Use different sections in your lunchbox to avoid squishing.
- Line containers with paper towels: This helps absorb excess moisture.
References
-
50 Sandwiches
-
Healthy Sandwich Recipes
-
Picnic Sandwich Recipes