Summer Camp Nails
Remember those summer camp days filled with tie-dye shirts, friendship bracelets, and endless fun? Imagine bringing that same playful, vibrant energy to your nails. Welcome to the world of Summer Camp Nails, where we explore trendy tie-dye designs, step-by-step guides, and the perfect nail shapes and colors to capture that carefree summer spirit. Whether you’re a nail art newbie or a seasoned pro, this guide will help you nail the look (pun intended) with ease and creativity.
From choosing between neon and pastel tie-dye palettes to incorporating nature-inspired elements like flowers and campfires, this article covers it all. We’ll dive into essential DIY nail art tools, tips for making your designs last, and even how to add a subtle summer camp twist with accent nails. Get ready to transform your fingertips into a nostalgic tribute to summer camp fun, all while staying on-trend and stylish. Let’s get started!
Trendy Tie-Dye Nails: Bringing the Summer Camp Vibe to Your Fingertips
Remember those summer camp days? The ones where you’d spend hours making tie-dye shirts, laughing with friends, and just soaking up the sun? Well, guess what? You can bring that same fun, carefree vibe to your nails. Yep, I’m talking about trendy tie-dye nails. Imagine looking down at your fingertips and getting hit with a wave of nostalgia and summer vibes. Sounds pretty cool, right?
Why Tie-Dye Nails?
Let’s get real for a second. Ever wondered why tie-dye nails are blowing up right now? It’s simple:
- Unique and Personal: Each design is like a fingerprintâno two are exactly alike.
- Vibrant and Fun: They scream summer, fun, and creativity.
- Versatile: Perfect for any occasion, whether you’re hitting a festival or just chilling at a BBQ.
Common Concerns
I get it, you might be thinking:
- âIsn’t it super complicated?â
- âDo I need a ton of tools?â
- âWill it even look good on my nails?â
Relax. I’ll break it down for you, step-by-step, so you can rock those tie-dye nails like a pro.
Getting Started
First off, you’ll need some basics. Here’s a quick checklist:
- Base coat and top coat: To protect your nails and make the design last.
- White nail polish: This will make your colours pop.
- A variety of nail polish colours: Go for vibrant shades like neon pinks, blues, and yellows.
- A small brush or a toothpick: For creating the tie-dye effect.
Step-by-Step Guide
- Prep Your Nails: Start with a clean, dry nail. Apply a base coat to protect your nails.
- Apply White Polish: This is your canvas. A solid white base makes those colours stand out.
- Add Dots of Colour: Randomly place dots of your chosen colours on the nail.
- Create the Tie-Dye Effect: Use a small brush or toothpick to swirl the colours together. Don’t overdo itâless is more.
- Seal the Deal: Once dry, apply a top coat to lock in your design and add shine.
Pro Tips
- Experiment: Don’t be afraid to mix and match colours.
- Practice: Like anything else, you’ll get better with practice.
- Keep it Fresh: Change up your design every couple of weeks to keep things interesting.
Looking for more ways to bring summer camp vibes into your life? Check out our Summer Camp Themes and Descriptions Guide for creative ideas. And if you’re planning to join a camp, make sure to go through our Summer Camp Counselor Duties and Responsibilities to better understand what to expect.
Step-by-Step Guide to Creating Summer Camp-Inspired Nail Art
Ever wondered how to nail that perfect summer camp vibe on your fingertips?
You’re in the right place.
Let’s break it down, step by step.
Gather Your Supplies
First things first, you need the right tools.
Here’s what you’ll need:
- Base Coat: Protects your nails and keeps the polish on longer.
- Top Coat: Adds shine and seals your design.
- Nail Polish Remover: For those inevitable mistakes.
- Cotton Pads/Q-tips: Cleanup crew.
- Nail Art Brushes/Dotting Tools: For precision.
- Various Nail Polishes: Think vibrant, playful colours like neon and pastel.
Prep Your Nails
Before we dive into the fun part, prep your nails.
- Clean: Remove old polish.
- Shape: File your nails into your desired shape.
- Buff: Smooth out the surface for a clean canvas.
- Base Coat: Apply a thin layer and let it dry.
Choose Your Design
Here’s where the magic happens.
Pick a design that screams summer camp.
Tie-dye, floral patterns, or even little campfires.
Creating the Design
Let’s go with a classic tie-dye look.
- Base Colour: Apply a white or light base colour. This makes the tie-dye pop.
- Add Colours: Drop blobs of different colours onto your nail.
- Swirl: Use a toothpick or a dotting tool to swirl the colours together.
- Clean Up: Use a Q-tip dipped in nail polish remover to clean around your nails.
- Top Coat: Seal your masterpiece with a top coat.
Tips for a Pro Finish
- Thin Layers: Always apply polish in thin layers. It dries faster and looks smoother.
- Dry Time: Give each layer enough time to dry. Patience pays off.
- Practice: Don’t worry if it’s not perfect the first time. Nail art takes practice.
Troubleshooting Common Issues
- Smudges: If you smudge a nail, dip a brush in nail polish remover and gently fix it.
- Chipping: Apply a top coat every few days to keep your design intact.
- Uneven Surface: Buff your nails again before starting over.
Vibrant and Playful Nail Colours Perfect for the Summer Season
Are you tired of the same old nail colours and looking to spice things up this summer? Let’s dive into some vibrant and playful nail colours that scream summer vibes. Whether you’re hitting the beach, going to a BBQ, or just want to feel like you’re on holiday, these colours will have you feeling fresh and fabulous.
Why Vibrant and Playful Colours?
First things first, why should you even bother with vibrant and playful nail colours? Well, think about it. Summer is all about fun, sunshine, and living your best life. Your nails should reflect that energy. Plus, bright colours can boost your mood and make you feel more confident. It’s like wearing a little piece of summer on your fingertips.
Top Vibrant Colours to Rock
When it comes to choosing the perfect summer nail colours, you can’t go wrong with shades that evoke the spirit of the season. Consider adding some creative ideas to your nail art to make them stand out even more. For a truly unique look, think about incorporating elements from your favorite summer activities, like those found at the top horse summer camps.
Summer Nail Shapes: Pairing Bold Designs with the Perfect Shape

Ever wondered which nail shape pairs best with those bold, summer camp-inspired designs?
You’re not alone.
Choosing the right nail shape can make or break your look.
Let’s break it down.
Why Nail Shape Matters
The shape of your nails can enhance the overall design.
It can make your tie-dye colours pop or your floral patterns stand out.
But how do you choose?
Popular Summer Nail Shapes
- Square Nails
- Best For: Bold, geometric designs
- Why: The flat edge provides a perfect canvas for intricate patterns.
- Oval Nails
- Best For: Soft, feminine designs
- Why: The rounded edges complement floral and nature-inspired art.
- Almond Nails
- Best For: Elegant, elongated designs
- Why: The tapered shape elongates your fingers, perfect for intricate and detailed art.
- Stiletto Nails
- Best For: Dramatic, edgy designs
- Why: The pointed tip is ideal for bold, standout designs.
- Coffin/Ballerina Nails
- Best For: Trendy, modern designs
- Why: The flat tip and long length make them perfect for showcasing detailed art.
Pairing Shapes with Designs
- Tie-Dye Patterns: Go for square or coffin nails. The flat edges make the swirling colours more vibrant.
- Floral Art: Oval or almond nails work best. The soft curves enhance the delicate patterns.
- Geometric Designs: Square or stiletto nails. Sharp edges and points make your lines crisp and clean.
Real Talk: My Go-To Shape
Personally, I love almond nails for summer.
They’re versatile and can pull off almost any design.
Plus, they’re less likely to break compared to stiletto or coffin shapes.
Quick Tips for Choosing Your Shape
- Consider your lifestyle: If you’re active, go for shorter, more durable shapes like square or oval.
- Think about maintenance: Longer shapes like stiletto and coffin require more upkeep.
- Match your style: Pick a shape that complements your overall aesthetic.
For more tips on creating summer camp-inspired nail art, check out our Step-by-Step Guide and DIY Nail Art Tools.
DIY Nail Art Tools: What You Need for Summer Camp-Themed Designs
Ever wondered how to nail those trendy summer camp-inspired designs without splashing out at the salon? Well, worry no more. I’ve got you covered with a list of essential DIY nail art tools that’ll bring that summer camp vibe right to your fingertips. Trust me, with the right tools, you’ll be creating mini-masterpieces in no time.
Essential Tools for Summer Camp Nail Art
- Nail Polish Collection:
- Base Coat: Protects your nails and ensures your design lasts longer.
- Top Coat: Seals in your design, adding shine and durability.
- Vibrant Colours: Think neon greens, sunny yellows, and ocean blues.
- Pastels: For those subtle tie-dye effects.
- Nail Brushes:
- Detail Brush: Perfect for intricate designs.
- Fan Brush: Ideal for creating gradient effects.
- Striping Brush: Great for lines and stripes.
- Dotting Tools:
- Different Sizes: From tiny dots to larger circles, these tools are a must-have for creating polka dots and other circular designs.
- Sponges:
- Makeup Sponges: These are great for blending colours and creating ombre effects.
- Tape and Stencils:
- Nail Art Tape: For those crisp lines and geometric shapes.
- Stencils: Perfect for quick and easy designs.
- Nail Art Pens:
- Fine Tip Pens: These are fantastic for adding details and writing.
- Tweezers:
- Precision Tweezers: Essential for placing tiny embellishments like rhinestones or decals.
Tips for Using DIY Nail Art Tools
- Start with Clean Nails: Always begin with a clean, dry nail. Remove any old polish and push back your cuticles.
- Practice Makes Perfect: Don’t get frustrated if your first attempt isn’t perfect. Nail art takes practice.
- Use Thin Coats: Apply thin layers of polish to avoid smudging and to speed up drying time.
- Seal Your Design: Always finish with a top coat to protect your artwork and add shine.
Real Talk: Common Concerns
âI’m not artistic. Can I still do this?â
Absolutely! Nail art is for everyone. Start with simple designs and work your way up. For inspiration, you can check out some summer camp game ideas to match your nail art designs.
âWhat if I mess up?â
No worries. Nail polish remover is your best friend. Plus, practice makes perfect.
âI don’t have a steady hand.â
That’s where tools like stencils and tape come in handy. They make it easier to create clean lines and shapes. You might also find some helpful tips in our summer camping packing list to ensure you have all the essentials for a perfect summer camp experience.
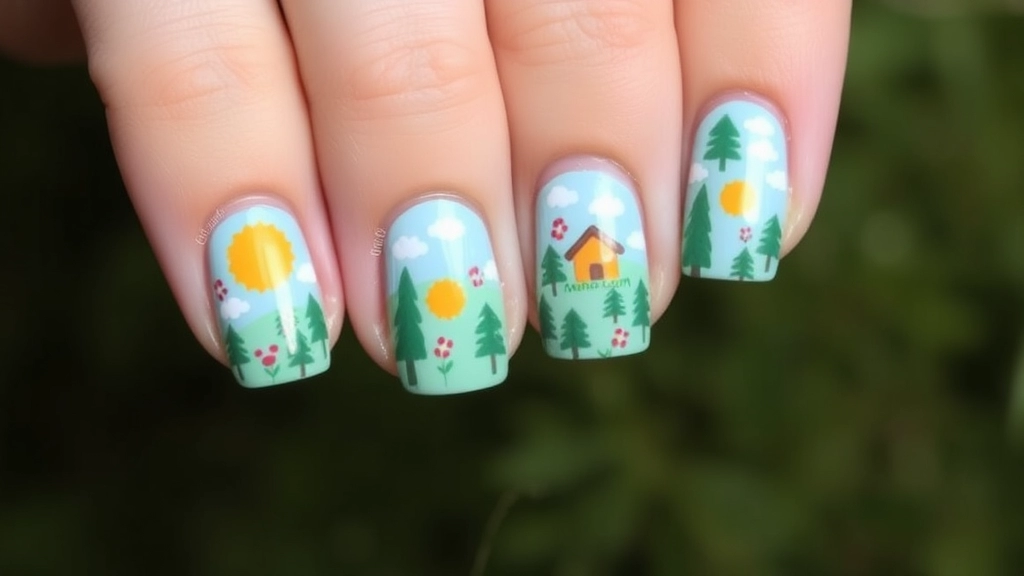
Incorporating Nature: Floral and Outdoor-Inspired Summer Camp Nail Ideas

Ever wondered how to bring the beauty of the great outdoors to your nails?
Let’s dive into some cool floral and outdoor-inspired summer camp nail ideas.
Why Nature-Inspired Nails?
We all love a bit of nature, right?
Why not bring that love to your fingertips?
Nature-inspired nails are:
- Fresh
- Vibrant
- Unique
Getting Started with Floral Designs
First up, floral designs.
They’re a classic.
But how do you make them pop?
Here’s how:
- Choose a base colour: Think sky blue or grass green.
- Pick your flowers: Daisies, sunflowers, or even wildflowers.
- Use a dotting tool: This helps create perfect petals.
- Add details: Tiny leaves or stems can make a big difference.
Outdoor-Inspired Nail Art
Floral designs are just the beginning.
What about the rest of the great outdoors?
Here are some ideas:
- Tree silhouettes: Use a fine brush to draw simple trees.
- Campfire scenes: Think tiny flames and logs.
- Mountain ranges: Simple yet stunning with a gradient background.
Tools You’ll Need
You don’t need a ton of stuff.
Here’s a quick list:
- Dotting tools
- Fine brushes
- Nail polish in nature colours: Greens, blues, browns.
- Top coat: For that long-lasting finish.
Quick Tips for Perfect Nature-Inspired Nails
Want to nail it every time?
Here are some quick tips:
- Start with a clear base coat: This helps your design last longer.
- Use thin layers: Thick layers can smudge and take forever to dry.
- Seal with a top coat: Keeps your design looking fresh.
Real Stories, Real Inspiration
I remember my first attempt at floral nails.
It was a mess.
But I kept at it.
Now, I get compliments all the time.
If I can do it, so can you.
Making It Last
Worried about your design chipping?
Here’s what you can do:
- Avoid hot water: It can make your polish lift.
- Use gloves: When doing chores.
- Reapply top coat: Every few days for extra protection.
Internal Links
Looking for more summer nail ideas?
Check out our guide on Trendy Tie-Dye Nails and Vibrant and Playful Nail Colors.
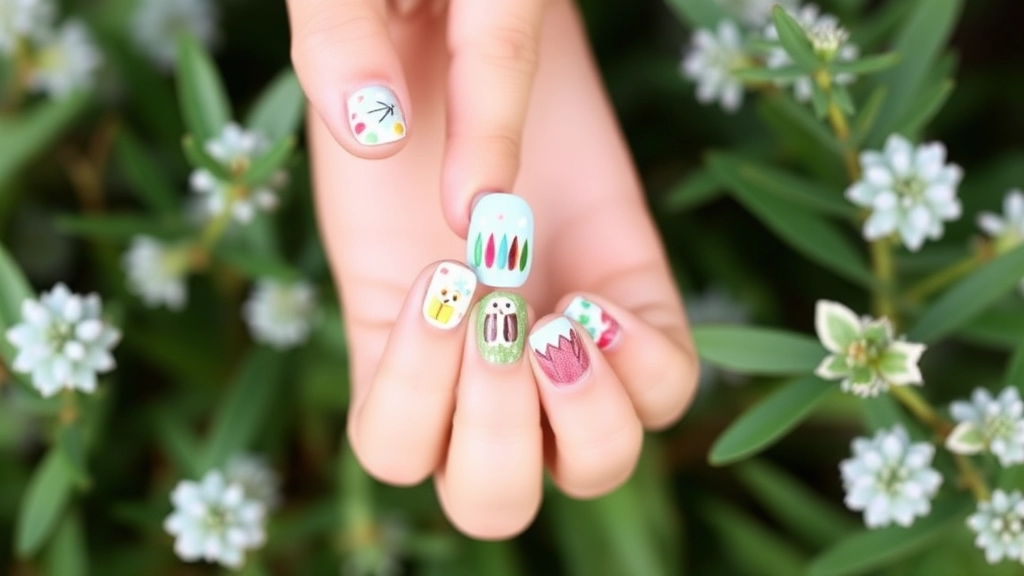
Accent Nails: How to Add a Subtle Summer Camp Twist to Your Manicure
Ever felt like your manicure could use a little extra flair without going overboard? Accent nails are your answer. They’re the perfect way to add a subtle summer camp twist to your manicure without turning your nails into a full-on art project. Let’s dive into how you can nail this look (pun intended).
Why Accent Nails?
Accent nails are like that one cool accessory that makes your outfit pop. They’re a great way to:
- Experiment with bold designs without committing to a full set.
- Show off your personality with a fun, unexpected twist.
- Keep your manicure versatile and adaptable for different occasions.
Choosing the Right Nail for Your Accent
Typically, the ring finger is the go-to for accent nails, but don’t be afraid to mix it up. Here are some options:
- Ring Finger: Classic choice, always a winner.
- Thumb: Makes a bold statement.
- Middle Finger: Adds a bit of edge.
- Pinky: Subtle but chic.
Design Ideas for Summer Camp Accent Nails
Alright, let’s get to the fun partâdesigns. Here are some cool ideas to bring that summer camp vibe to your fingertips:
- Tie-Dye Swirls:
- Use vibrant colours like neon pinks, blues, and yellows.
- Apply a white base coat, then add drops of your chosen colours.
- Swirl them together with a toothpick for that classic tie-dye look.
- Nature-Inspired Art:
- Think leaves, flowers, or even tiny campfires.
- Use a fine brush for detailed work.
- Go for earthy tones like greens and browns.
- Camp Icons:
- Draw small tents, marshmallows on sticks, or even a canoe.
- Keep it simple with one icon per nail.
- Neon vs. Pastel:
- Use neon colours for a bold look.
- Pastels for a more subdued, yet playful, vibe.
- Mix and match for a unique twist.
Tools You’ll Need
To get these designs just right, you’ll need a few tools:
- Fine-tipped brushes for detailed work.
- Dotting tools for perfect circles.
- Nail tape for clean lines.
- A toothpick or needle for swirling tie-dye designs.
Pro Tips for Long-Lasting Accent Nails
No one wants their hard work to chip away in a day. Here are some tips to make your accent nails last:
Neon vs. Pastel Tie-Dye: Choosing Your Summer Camp Colour Palette
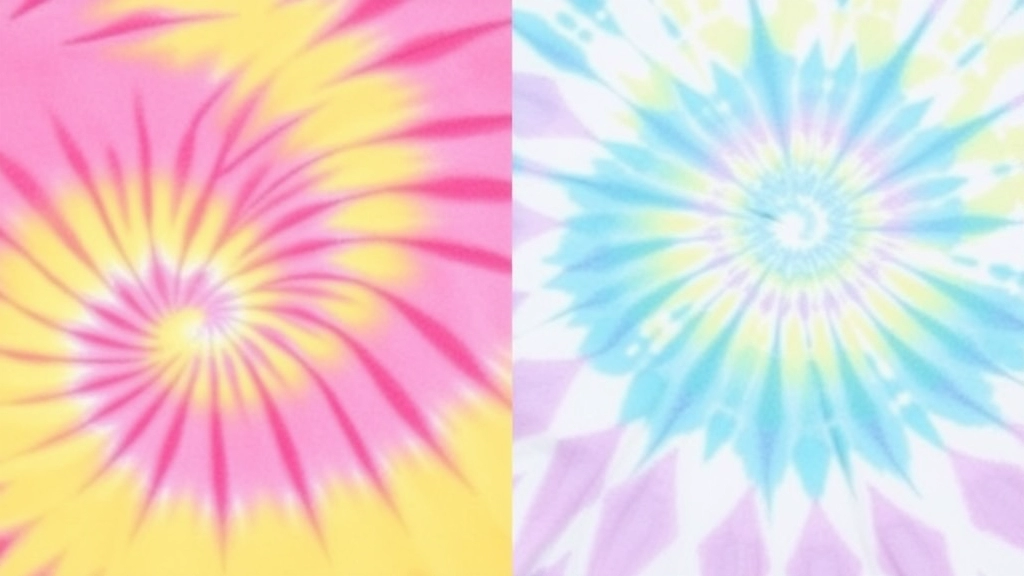
So, you’re diving into the world of tie-dye nails, and you’ve hit a snag. Neon or pastel? It’s a real dilemma.
Neon Tie-Dye: Bold and Bright
Neon tie-dye is for those who want their nails to scream summer. Think highlighter pinks, electric blues, and vibrant greens.
Why go neon?
- Stand Out: Neon colours are hard to miss. Perfect for making a statement.
- Energy: These shades bring an energetic vibe, matching the summer camp spirit.
- Trendy: Neon is always in, especially during the sunny months.
But, let’s be real. Neon isn’t for everyone.
Pastel Tie-Dye: Soft and Subtle
Pastel tie-dye is the softer, more understated cousin. We’re talking baby blues, soft pinks, and gentle lavenders.
Why go pastel?
- Elegance: Pastels are chic and sophisticated.
- Versatility: They blend well with almost any outfit.
- Calm Vibes: Perfect for a relaxed summer day.
Mixing It Up
Can’t decide between neon and pastel? Why not both?
Create a mixed palette:
- Accent Nails: Use neon on one or two nails and pastel on the rest.
- Gradients: Blend neon and pastel shades for a unique look.
- Patterns: Combine neon and pastel in your tie-dye design for a balanced look.
Real Talk: What Suits You?
Ask yourself:
- What’s Your Style? Bold or subtle?
- Where Are You Going? Beach party or a casual day out?
- What’s Your Skin Tone? Some colours pop more depending on your undertone.
Pro Tips for Choosing Your Palette
- Test First: Try a small swatch on a nail to see how it looks.
- Consider the Occasion: Neon for parties, pastel for everyday wear.
- Mix and Match: Don’t be afraid to experiment.
Creative Summer Camp Nail Designs for Different Occasions
Ever wondered how to nail that perfect summer camp vibe for different events? Whether it’s a casual day out, a music festival, or even a beach wedding, your nails can be the ultimate accessory. Here’s how you can make your nails pop for any occasion with some summer camp-inspired designs.
Everyday Casual Nails
When it comes to daily wear, you want something that’s fun yet not too overwhelming. Think about the classic tie-dye patterns but with a subtle twist. Here’s how you can achieve that:
- Muted Tie-Dye: Opt for pastel shades like soft pink, light blue, and mint green. These colours keep it casual but still give you that playful summer camp feel.
- Accent Nail: Add a single accent nail with a small campfire or tent design. It’s a small detail that can make a big impact without being too loud.
Festival Fun
Heading to a music festival? Your nails can be as loud and vibrant as your outfit. Here are some ideas:
- Neon Explosion: Go all out with neon tie-dye patterns. Think bright yellows, electric blues, and hot pinks. These colours will definitely catch some eyes.
- Glitter and Gems: Add some sparkle with glitter polish or tiny gems. Apply them to the tips or create a gradient effect for that extra festival flair.
Beach Days
For those lazy beach days, you want something that’s low-maintenance but still chic. Here’s what you can do:
- Ocean-Inspired Colours: Use shades of blue, turquoise, and sandy beige. Create a tie-dye effect that mimics the waves.
- Shell Accents: Add tiny seashell decals or stickers to one or two nails. It’s a subtle nod to the beach without going overboard.
Special Occasions
Got a beach wedding or a summer party to attend? Your nails can be both elegant and fun. Here’s how:
- Elegant Tie-Dye: Use a more sophisticated colour palette like gold, white, and soft pink. Create a marbled tie-dye effect for a classy look.
- Floral Designs: Incorporate small floral patterns that match your outfit. Think daisies or sunflowers, which are perfect for summer events.
Quick Tips for All Occasions
To make your summer camp nails last through different events, here are some quick tips:
How to Make Your Summer Camp Nails Last: Tips for Durability
Ever spent hours perfecting your summer camp nails, only to have them chip the next day?
Yeah, we’ve all been there.
But don’t worry, I’ve got some solid tips to keep your trendy tie-dye nails looking fresh and fabulous.
Start with a Clean Slate
First things first, make sure your nails are clean and dry before you start.
Any dirt or oil can mess with the polish sticking properly.
Pro Tip: Use a nail cleanser or even a bit of rubbing alcohol to wipe down your nails.
Base Coat is Your Best Friend
Don’t skip the base coat.
It’s like the foundation for your nail art.
A good base coat helps the polish adhere better and prevents staining.
Thin Layers, Always
When applying your polish, go for thin layers.
Thick layers take forever to dry and are more likely to chip.
Quick Tip: Two to three thin layers are better than one thick one.
Seal the Deal with Top Coat
A top coat is a must.
It seals in your design and adds a protective layer against chips and scratches.
Pro Tip: Reapply your top coat every couple of days to keep your nails looking fresh.
Avoid Hot Water
Hot water can weaken your polish.
So, try to keep your hands out of hot water as much as possible.
Real Talk: Use gloves when doing dishes or cleaning.
Moisturise, Moisturise, Moisturise
Dry nails are more prone to breaking and chipping.
Keep your nails and cuticles hydrated with a good hand cream or cuticle oil.
Be Gentle
Your nails aren’t tools.
Avoid using them to open cans or scrape off stickers.
Quick Story: I once ruined a perfect manicure trying to open a soda can. Never again.
Quick Fixes for Chips
If you do get a chip, don’t panic.
You can do quick touch-ups with a bit of polish and top coat.
Pro Tip: Keep a mini nail kit in your bag for emergencies.
For more tips on maintaining your summer camp style, check out our guide on summer camping aesthetics. And if you’re looking for fun activities to complement your stylish nails, don’t miss our list of summer camp activity ideas.
FAQs for Summer Camp Nails
What tools do I need to create summer camp nail art?
You’ll need a few essential supplies:
- Base Coat: Protects your nails and helps the polish last longer.
- Top Coat: Adds shine and seals your design.
- Nail Polish Remover: For fixing mistakes.
- Cotton Pads/Q-tips: For cleanup.
- Nail Art Brushes/Dotting Tools: For precision.
- Various Nail Polishes: Vibrant, playful colours like neon and pastel.
How should I prep my nails before starting the nail art?
Preparation is key to achieving a smooth and long-lasting design:
- Clean: Remove old polish.
- Shape: File your nails to your desired shape.
- Buff: Smooth out the surface for a clean canvas.
- Base Coat: Apply a thin layer and let it dry.
What are some popular design ideas for summer camp nails?
Popular designs include:
- Tie-Dye: Use vibrant colours and swirl them together.
- Floral Patterns: Daisies, sunflowers, and wildflowers.
- Campfire Scenes: Tiny flames and logs.
Which nail shapes work best with summer camp-inspired designs?
Different shapes can enhance your designs:
- Square: Best for bold, geometric designs.
- Oval: Great for soft, feminine designs.
- Almond: Ideal for elegant, elongated designs.
- Stiletto: Perfect for dramatic, edgy designs.
- Coffin/Ballerina: Suitable for trendy, modern designs.
How can I make my nail art last longer?
To extend the life of your design:
- Avoid hot water: It can lift the polish.
- Use gloves: When doing chores.
- Reapply top coat: Every few days for extra protection.
Should I choose neon or pastel colours for my tie-dye nails?
Both options have their own appeal:
- Neon: Bold, energetic, and perfect for making a statement.
- Pastel: Chic, versatile, and great for a relaxed look.
If you can’t decide, try mixing both for a unique look.
What are some quick tips for achieving a professional finish?
Follow these tips for a flawless look:
- Thin Layers: Apply polish in thin layers to avoid smudging.
- Dry Time: Allow each layer to dry completely before adding another.
- Practice: Nail art takes practice, so don’t get discouraged if it’s not perfect the first time.
How do I fix common nail art issues like smudges and chipping?
Here’s how to troubleshoot common problems:
- Smudges: Use a brush dipped in nail polish remover to gently fix it.
- Chipping: Apply a top coat every few days to keep your design intact.
- Uneven Surface: Buff your nails again before starting over.
References
-
Summer Nail Designs: Inspiration and Trends
-
Essential Nail Art Tools: What You Need
-
Nature-Inspired Nail Art Ideas